A Huge Thank You

Thanks for taking the time to visit my Stampin' Up! blog. I would love for you to either leave a comment or follow my blog and then I can come and see your work and leave comments for you too.

Emma xx
Independent Stampin' Up! Demonstrator in England UK. All things Stampin' Up for card making, scrapbooking, wedding stationery, gifts, card making classes, scrapbooking classes, gift making classes.
http://picasion.com/i/1TioE/

Monday, December 28, 2009

Another one for Fiskarettes

Hi Guys

Now that Christmas is over it is time to things crafty that are not RED, GREEN or GLITTERY.

This is a little tutorial to make a box (I found this on the net and apologies but I can not remember where I got it so apologies for
that).

Here is a picture of the pattern.
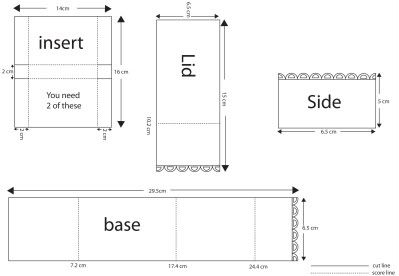


I hope I have done it right. If you click on it you should go to a bigger version.

Materials you need

Card in two complementary colours
Patterned paper
Ribbon (about 16")


Cut all of the pieces and score as directed.

Starting with the inserts, stick them to the base and fold up and stick the sides too. Punch the end with a fancy border punch.

Adhere the lid to the underneath of the scalloped flap to complete the lid.

Taking ribbon of your choice, cut it in half and adhere one each to the side pieces. Now stick these to the side of the box.

The flowers

It is amazing what you can do with a scallop circle punch. Both of these flowers were made with a scallop circle punch.

The top flower

Punch 6 circles and cut into the middle of them, going further into the middle of the circle as you go.

Take each 'petal' and curve it around an embossing tool. When you have done all 6.

Start with the one that has the biggest 'middle' bit and stick the next one on top of it, carry on 'til they are all stuck together.

Taking a 1/8" circle punch, punch a hole in the middle and add a brad to pretty it up.

Bottom Flower (I got this from Monica and Stamp With Us)

- This again was made using a scallop circle punch.

- You need 8 circles (4 of each colour). (You can cut them like the first flower or do it plain like I have)

- Lay them flat on your cutting mat and spritz them with water on both sides.

- Scrunch them up and then blot them with kitchen paper.

- Now straighten them out and place alternately one on top of the other. Take four and punch with the 1/8" circle punch and again with the other four.

- Place them all together and place a brad in the middle and leave to dry

When the flowers are dry they will 'crisp' up and keep the shape that they have been 'scrunched' into.

I hope you like this and understand the directions.

Until next time

Happy crafting

Emma xx

Sunday, December 27, 2009

The Stamp Man Blog Hop, Candy, and Award Event


The Stampman are hosting this blog hop. The reason for this is not to create a new project, (because if you are like me you just haven't got the time to do it at the moment), but to showcase a project that you are proud to have done during 2009 and then you can place this award on your blog too.

You should have come here from the lovely Teri's blog and from here you will go to the lovely Lisa's blog. If you have come straight here then you can go to The Stampman and start from the beginning.


The project that I am going to showcase is one that I did really recently. It is my pheasant and this is for two reasons. Reason 1 is that I have finally mastered brayering and it is now a technique that I love doing, reason 2 is the fab trick that I learnt at Stampin' Up! convention about using a piece of felt as a stamp pad. Use a piece of felt and stamp the image with stazon ink so you have the outline. Using this as a guide, go over the image with different coloured re-inkers until you have finished colouring your 'image' and then use this as a stamp pad and you will get a fabulously coloured image without the hassle of using pens and then huffing at the end of it. The felt 'stamp pad' is also good for about 10 - 15 stamps as well.

There are lots of prizes to be won. The one that I have to tell you about are a selection of Moonglow products. I have some moonglow sprays and they are lovely. In order to be in with a chance of winning any of the prizes on this blog hop you need to leave a comment on ALL the blogs you visit including the Stampman blog. When you have all of the letters email them to thestampman@btconnect.com

This hop is from today and will carry on til midnight GMT 3rd January 2010.

Good luck and don't forget to comment on every blog to be in with a chance of winning. Now go and see Lisas blog.

My Letter by the way is N. Good Luck.

Until next time, happy crafting

Emma xx

Thursday, December 24, 2009

Some more Christmas Cards


Hi Guys

This year has been fun for making Christmas cards, firstly the ones that my hubby made as seen in previous post, then the ones for my stamp class ladies and now these for the kids.

We wanted to do something a bit different for the kids, so out came the punches and some thought and this is what we came up with.


from the top left (in case you cant see what they are), we have a penguin, Christmas tree, a robin, an angel, Father Christmas, a snowman and last but not least a polar bear. What a polar bear and penguin have to do with Christmas I don't know, but it seemed like a good idea at the time. We needed 7 different christmassy things and polar bear and penguin came into the equation.

They are all made from a variety of Stampin' Up punches.

I hope you like

Until next time

Happy Crafting and a Happy Christmas

Emma xx

Watch out for this


This is happening

Keep watching and you will find out more!!!

Until next time

Happy Crafting

Emma xx

Tuesday, December 22, 2009

Christmas Cards

Hi Guys

Well I hope that everyone has received their cards by now so that I can show them to you. Many of you will find this very hard to believe but Andy, my darling hubby, made the cards with the Christmas trees on. He stamped the image, coloured with prismacolour pencils, added stickles, matted and layered them and then asked me to help him with the ribbon. I am really proud of him and I think that he has done a fab job and secretly (I think that he is a closet crafter and enjoys it really).


The stamp is from Stampin' Up! Fun and Fast notes. Real Red and garden green card stock.

Until next time

Happy Crafting

Emma xx

Sorry for being a bad blogger


I know that it has been a while since my last post but I have not had internet. I have quite alot to show you as well.

Lets start with Tuesday Taggers. Let it Snow is the last challenge until 2010 as the Design Team have been given a holiday!!! Woo Hoo:).

My take on this is an ATC (I know, I know. It is something that I do rarely) as it suited the stamp set that I used. I have used Stampin' Up! Winter Post. I have used Blush Blossom to stamp the postcard stamp and Do not open sign. To stamp the post mark I have stamped off the stamp first and then placed it on the card. I have sponged around the edge with blush blossom and close to cocoa.

I have stamped the couple in Close to Cocoa and then used the blending pen to pull the colour in to the image.

This has all been done on Very vanilla card stock. I have added dazzling diamonds to the bobbles on the hats and also under the skates. If you look closely you can see a shadow underneath the skates. This is done by stamping your stamp on the smooth side of your imaging sheet (part of your stamp-a-majig) placing it underneath your image and rubbing to transfer the image to your design.

I hope you like

Until next time, happy crafting

Emma xx

Wednesday, December 16, 2009

A Secret Santa pressie

Hi Guys

At the craft club that I run we have a social twice a year. Well last night was our Christmas social. We had fun and games and food and cakes.

We always have a secret santa at the Christmas social and this year I decided to make my pressie. I have been wanting to try stamping on candles for ages and just never found the time, well I found the time for these and then I made some more afterwards but wrapped them up without taking photos and have already given them out.

Here are the ones that I took photos of. The candles were cheap ones (£1) from Asda, I finally found some tissue paper in Rymans, (I can't believe how hard it is to find tissue paper). For the required wax paper I used greaseproof paper.


I have used two stamp sets for this, Circle Circus and Trendy Trees, the inks that I used were Old Olive, Close to Cocoa and Garden Green. I stamped them onto the tissue paper and cut as close as I could with my scissors, tacked them to the candle with some snail and then wrapped the greaseproof and used my heatgun to 'melt' the wax until I saw it change. Stopped heating and then smoothed over the greaseproof with my hand and voila, a stamped candle.

Hope you like

Until next time

Happy crafting


Emma xx

Fiskarettes


Hi Guys

Here is a card that I put together for Fiskarettes. I have used a border punch and then used the punched out pieces to do the decorations down the side of the card. I have also used a scallop circle punch to make the flowers. The centre for the punch is a 1/2" circle from Stampin' Up as is the greeting stamp. The little stamped images around the top card layer are also Fiskars.


I hope you like and until next time

Happy Crafting

Emma xx

Tuesday, December 15, 2009

Tuesday Taggers - Jolly Old Saint Nick


Hi Guys

Todays challenge on Tuesday Taggers is 'Jolly Old Saint Nick'. The girls on the DT have done a fabulous job again and there are some lovely examples and very varied again. Our guest designer Suzanne has surpassed herself, even though she says that she was very nervous about doing this.


My entry is some punch art. They are boxes of Lindt chocolates that are for spot prizes at my clubs Christmas Social tonight. I have made them in to Santa by using what seemed like hundreds of punches. Seriously though it did take 9 seperate punches to make these. They go like this (all SU! punches)

1 3/4" Circle = head (Blush Blossom)
Small Tag = Hat (Real Red)
1/2" Circle = nose (Blush Blossom)
Boho Blossoms = Pompom (Whisper White)
Scallop Oval = Beard (Whisper White)
1/4" Circle = Eyes (Whisper White)
Scallop Circle = Hair (Whisper White)
1/8" Circle = Eyes (Black)
Scallop Edge = Trim on hat (Whisper White)

His cheeks have been coloured with Stampin' Pastels. His coat is made from a Real Red rectangle with the top corners clipped, a strip of black for his belt and some gold for his belt buckle.

I hope this makes sense to you and you have a go at doing them. If you do, please let me know so that I can come and have a look.

Until next time

Happy Crafting

Emma xx

First things first

The winner of my Reindeer Journal is


the wonderful Georgina. Congratulation Georgina, if you could let me have your postal address by email here emmadaye@ntlworld.com.

Emma xx

Blog Candy - This will stay at the top. Please scroll down for new posts


I had so many lovely comments about my reindeer journal that I have decided to give it away as candy. So if you want to win this


- Then leave me a comment,
- post on your blog

and I will announce the winner on Tuesday 15th of December and then it will be with you in time for Christmas. (if you don't have a blog you can still enter by leaving your name at the bottom, anonymous will not be counted).

Good Luck

Emma xx

Friday, December 11, 2009

Guess What is coming???


No not just Christmas. From 30th December you can

Sale-a-brate with me

This is just a teaser. I will be posting some sneak peaks over the weekend. So keep looking and you will see them. I will also be posting some other offers that are just from me.

So until next time

Happy crafting

Emma xx

Tuesday, December 8, 2009

Better late than never ...

... a winner for the image I used for the blog hop on Sunday.


So without further ado. Number 26 is IRIT SHALOM. So Irit if you would like to email me your email address I can send the image on to you.

Emma xx

Monday, December 7, 2009

Tuesday Taggers - The Christmas Tree


Hi Guys

This week on Tuesday Taggers we have been challenged to do 'The Christmas Tree'. I have chosen to do some teabag folding and an easel card. I know that easel cards have done the rounds and I am probably one of the last to do them but hey I like them and here is my card.


I have used Old Olive and Chocolate Chip Designer Paper, Very Vanilla card stock, So Saffron grosgrain ribbon and the stamp sets Wondrous Gift and Wonderful Words. I have inked around the edge of the Very Vanilla Card stock with Old Olive ink.


Here are instructions on how to fold the squares (not my own instructions). I started with 3" squares for my project.

I hope you all like, please leave a comment if you do so I can visit you.

Until next time

Happy crafting

Emma xx

Saturday, December 5, 2009

Hi Guys

From 0900 this morning until Tuesday (the start of the next challenge), Tuesday Taggers are on a mission. This mission is simply a blog hop to celebrate the birthday of St Nicholas, who in Europe is also known as Father Christmas and celebrate the Birthday of fellow Tuesday Tagger Avril.

You should have come here from the lovely Debbies blog. For this we have chosen an image from Teri's website and used it to create our entry. Because it is for Christmas I have chosen a reindeer with pressie.


I have teamed this up with lots of yummy SU! goodies. I have used the On Board Journal with Very Vanilla cardstock that I have sponged with Real red ink and gone round the edges with Old Olive ink. I have used the faux bleach effect by flicking water on my inked up piece to create 'bleached' out spots.

I have coloured the image with my Stampin' Write markers and added fine galaxy glitter and dazzling diamonds to give bit of bling to it. I have also used the snowflake from the Wondrous Gift stampset and embossed with clear powder and also with white craft ink.


I hope you enjoy this hop and will come back again soon.

The letter you need to collect from me is D. So leave me a comment and hop on over to the lovely Lyn.


Until next time

Happy Crafting

Emma xx

Wednesday, December 2, 2009

Hi Guys


Well I promised sneak peaks of the cards that I would be teaching today. I didn't get them done but here they are now. I will be teaching theses cards again on 16th December for those of you who couldn't attend today or need last minute hand made cards.


So ladies and gents if you live in the Grantham area and would like to make these cards then we will be doing a £5 for 5 card event on the 16th December. For an extra £1 we will be doing a gift box that you can put smellies or anything else you want in.

Until next time

Happy Crafting

Emma xx

Tuesday, December 1, 2009

Tuesday Taggers - Christmas Carol


Hi Guys

Well when I first saw this challenge title I wondered what on earth I could do for this. In the end though it took my hubby to convince me of what to do. He didn't do this by telling me what to make or what carol to choose, he did it by just being his lovable self. He is one that believes that Christmas should start on 24th December and end on 26th December. With this in mind here is my piece of work for this weeks challenge. I didn't choose a traditional Christmas carol like Janet did, or go with a picture of carolers singing, no instead I went with Charles Dickens 'A Christmas Carol' and Bah Humbug.


I have used, (believe it or not), Real Red ink and Old Olive ink and coloured the card with sponges. I have then used water and flicked it on to the card stock to achieve the faux bleach effect. Unfortunately I don't have a stamp set small enough to do the text so I cut this out on my machine. The holly leaves are cut out by hand, as are the berries. The berries have been made by punching into Real Red cardstock with the crop-o-dile. I have finished off the berries and letters with Crystal Effects.

Well until my next post happy crafting.

Emma xx