A Huge Thank You

Thanks for taking the time to visit my Stampin' Up! blog. I would love for you to either leave a comment or follow my blog and then I can come and see your work and leave comments for you too.

Emma xx
Independent Stampin' Up! Demonstrator in England UK. All things Stampin' Up for card making, scrapbooking, wedding stationery, gifts, card making classes, scrapbooking classes, gift making classes.
http://picasion.com/i/1TioE/

Saturday, December 10, 2011

Oh My Gosh....

.... where does time go?  I have been so busy just lately with craft fairs and making pressies for Christmas (not just for me but commissions too).

I have also had classes and my latest class was last Monday.  We made these


They were cut using the petal cone die and the bigshot.  We used Crajun Craze card stock and stamped with the Creative Elements set in Crajun Craze ink around the bottom of the cone.

We stamped the flower and the butterfly several times and decoupaged them in order for them to be 3D.


We trimmed with Cajun Craze widestripe grosgrain and Crochet Trim Victoria.  I took this photo before we added some pearls to the centre of the butterfly.

I hope you like and will be back soon.

Until next time

Happy Crafting

Emma xx


Sunday, November 20, 2011

Wowee

Hi Guys

Well I have arrived back from the third European Convention which was in Disneyland Paris and I had such a fab time.

I was privileged to be able to walk across the stage for a Leadership Award which I knew I was collecting before we went.  What I wasn't expecting was the fact that I made it into the Top 25 Demonstrators in the UK, so I am absolutely thrilled and I would like to thank each and every one of you who follow my blog,  who buy from me and are loyal customers and my team.  And of course my wonderful hubby for his support over the last year.

I said before I went that I would show you the projects that I made for people whilst I was away.

The first is my 3D and roomie gift


I made a teddy bear that was inspired by one that was on Shelli Gardners blog.  I made it by cutting out several circles from my No 2 circle die and my scallop circle die.  The nose is a glimmer brad and the eyes are Basic Rhinestoes.  I then made a little box for them to go in.  Just so you get some size of the scale of these, the box is just 3.5" tall!!  I have used the Flirtatious DSP and Fabric and trimmed with a melon mambo ribbon.

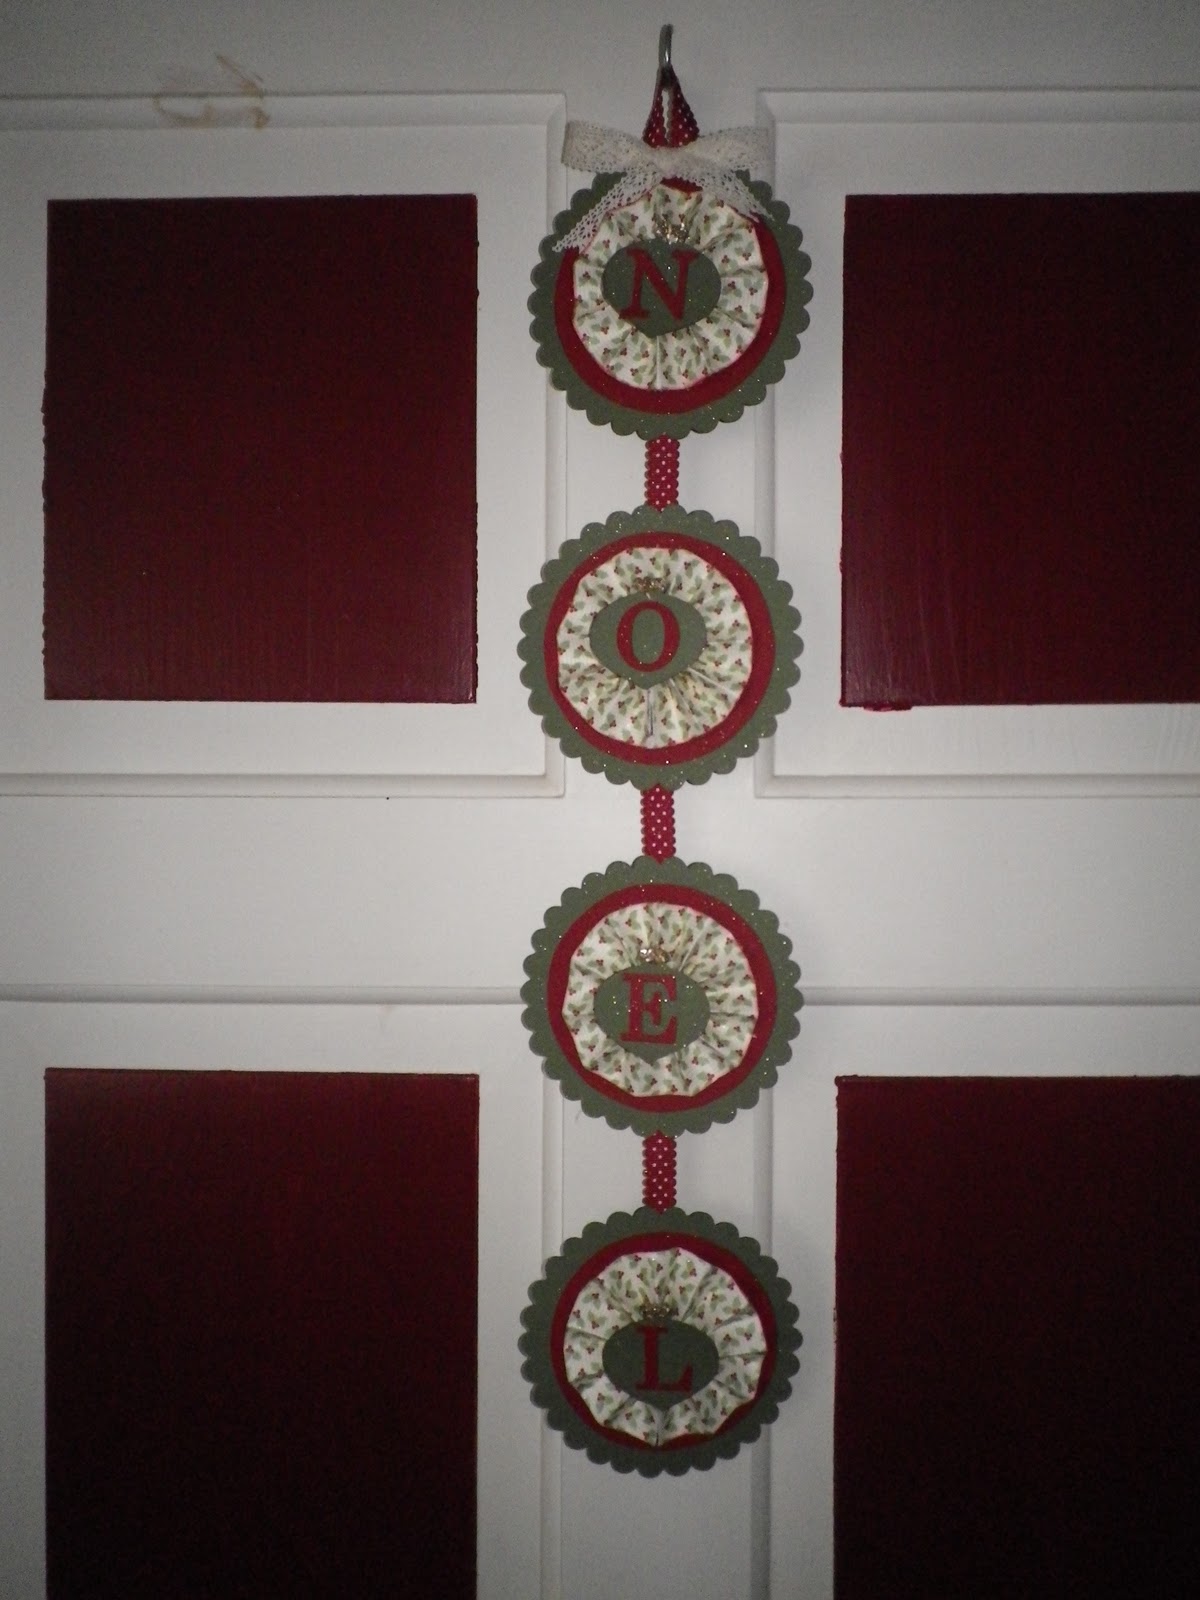
Also for my roomies and travel companions (6 of us travelled together) I made these...


These were decorated with the Beau Chateau DSP and coordinating card stock.  I have used the scalloped ribbon punch to trim and the Chantilly lace crocheted ribbon for accents.  I have then topped it with each girls initials and they can use it for what they want.


This is my general swap and I made it using the Sail Away A la Carte stamp and sponged with Lucky Limeade and Island Indigo.  I stamped on with Stazon.

My last offering for today is my card candy swap for which I used the 'Under The Big Top' stamp set that I received for free at this years Leadership training (join my team and you could earn stamp sets like this too).


 I had some fabulous swaps back and they will come another day.

I hope you like and until next time

Happy Crafting

Emma xx

Wednesday, November 16, 2011

One more Sleep

Hi Guys

Well just one more sleep til the fun begins.  Tomorrow sees 6 of us travelling from Lincolnshire to Disneyland Paris to celebrate our yearly Convention with Stampin' Up!  There will be around 350 Demonstrators from UK, Germany and France gathering in Disneyland Paris for Convention and OMG will we be giddy.

I have some sneak peeks for you to goggle at today and I will post the full projects when I get back as they are my swaps and gifts for Convention

3D and roomie gift sneak

General Swap Sneak

Candy Sneak

Tin Sneak


If you are going to Convention then I will see you there if not I will have photos and tales when I get home.

Until then have fun

Happy crafting

Emma xx

Tuesday, November 8, 2011

Convention preparation

Hi Guys

No photos today but will be able to show you them late next week.

I have been very busy the last few days preparing for Convention.  Today I sat and made 100 swaps. What a marathon! PHEW!!

 I took a day off on Sunday and went to the NEC in Birmingham visiting the Crafts at Christmas exhibition. I had forgotten how tiring it could be spending all that money!! Hello to everyone that was on the Stampin' Up! stand.

 Anyway I will see all of you going to Convention a week on friday. Yippee... I can't wait!  Mickey Mouse here I come.

Have fun and until next time

Happy Crafting

Emma xx

Wednesday, November 2, 2011

Star and Pyramid Cards

Hi Guys

Well this week saw my bi - monthly class again (held every other Monday) and we made some lovely cards.  They were a Star Card and a Pyramid card.  I have seen them a few times on the internet and not sure where I saw them first.

I have used the Holly Berry Bouquet papers to  to make both cards .

The Star card base is done in Whisper White. The flowers were made using the Five petal punch and also the boho blossoms punch. The flowers are made using Real Red card and Wild Wasabi and spritzed with Frost White Shimmer paint.  The centres of the flowers are the new Gold glimmer brads.  The points of the star are edged with Wild Wasabi punched with the scallop ribbon border punch and put through the paper crimper. They are then sparkled with Basic Rhinestones.  The greeting is from the set Perfect Punches.


Our second card this week was a Pyramid card.


The base of the Pyramid was done in Very Vanilla and  Cherry Cobbler.  The bow was made using Very Cherry Cobbler card punched using the scallop ribbon border punch and also a piece of  Chantilly Crochet Trim and we added some Basic Pearls. The Flowers have been cut with the Fun Flowers die in Cherry Cobbler and So Saffron.  We scrunched them up and layered them up and adhered them to the front of the card.

If you would like to join us then email me or ring me on the number at the top of my blog and I would be happy to give you more details.

I hope you like and until next time

Happy Crafting

Emma xx

Sunday, October 30, 2011

Christmas in October

Hi Guys

We had a great time in Long Bennington last weekend doing "Christmas in October".  We did several projects showcasing the fabulous new Christmas DSP Holly Berry Bouquet and the ornament punch . 

The first project was a hanging decoration.


The outer circle was made using the Scallop Circle die in Always Artichoke. The middle circle was done in Cherry Cobbler.  The circle was made from a template using the outer cardboard from a spool of Stampin' Up! ribbon (resourceful eh!).  The rosette was an 11/2 inch x 12inch piece of DSP scored at 1/4 inch intervals and folded. The centres were punched using the ornament punch and the tops of these were sparkled with champagne glass glitter.  We used two of the gorgeous new ribbons to hang and embellish.  The first being the scalloped dots ribbon in Cherry Cobbler and the second was the Crochet Trim ' Victoria'.


To finish it off and give more Christmas pizazz the whole hanging was spritzed with shimmer paint diluted in an alcohol spray.


Project no 2 was a very cute Santa.

I got the idea of this from my upline Zoë.  I do know that there are a lot out there on the internet too.


His body was made with the Pillow Box Die in Real Red card.  His beard was The large scallop die in Whisper White card which was then embossed using the Vintage Wallpaper embossing folder. It was folded to create his fringe.  His face was made by using the ornament punch out of Pink Pirouette. His nose and mouth were both punched with the 1 /4" circle punch, one in real red and one in Pink Pirouette.  His moustache was created using two petals from the 5 petal flower punch and his cheeks were daubed with Real Red.  Isn't he lovely?


Project no 3  was this very festive Lumiere


The main box was made with Real Red card.  The top of the Lumiere was punched using Scallop Trim Border punch. We then punched out an ornament shape on all four sides.  The DSP was then adhered to the sides and the box constructed.  It was decorated on two sides using Real Red 1/4" grosgrain ribbon bows.

What a very busy day we were having!! However in between all of this, coffee and tea breaks galore were had all provided by my wonderful hubby.  Lunch was also taken care of during the day from the local chippy, so suitably refreshed we could get back to the all important business of the day...CRAFTING!!!


Project no 4 was a box containing 4 Christmas cards


I am sorry about the clarity of the sentiment stamped on this picture.


The box was was made from a sheet of Real Red card.  On the top was a of the lovely DSP Christmas paper.  This one, like the paper used on the Lumiere is really lovely as they are both glittered on the sides that we have used. The lid was embellished with a sentiment from the Contempo Christmas stamp set onto a punched out Decorative Label.  The embellishment was made using both Real Red and DSP punched out baubles.

The card body was Very Vanilla.  This was then matted with Old Olive. The red topper was cut using the Top Note Die and then embossed with the Vintage Wallpaper embossing folder.  This was then cut in half and used on two cards. Before being adhered to the card with Dimensionals, a Real Red grosgrain ribbon was tied around .  A bauble the same as was used on the box was then attached and the sentiment stamped on.  Today we used one of the clear stamping blocks which appeared to be loved by all!!

And last but not least Project no 5  A lovely little cracker 


We cut out a cracker using the Candy Wrapper die in Glittery DSP.  It was decorated with a bauble made from the ornament punch  and filled with a Ferrero Rocher.  I wonder how many of these will be left by Christmas?  Not many if I am anything to go by!


That was the end of our lovely day so thanks to all that came.


Until next time have fun

Happy Crafting

Emma xx

Wednesday, October 26, 2011

What a fab weekend

Hi Guys

Well I had yet another busy weekend last weekend.  On Saturday a I had a Christmas class and I will come back with details on that later.  On Sunday I did a brand new papershow in Braunston, Leicester with my friend and Upline Zoë Tant and it was great.

We had a busy day and saw lots of lovely people, some old faces and lots of new ones.


This is our stand before we started.


These two show Zoë manning the make and take stand.  I did do some work but just happened to be behind the camera at this point.
If you were there then hello and it was lovely to meet you and we look forward to seeing you next time.

Until next time

Happy crafting

Emma xx

Monday, October 17, 2011

Beau Chateau Drawers

Hi Guys

Well Monday are my club days and today we made a lovely little pair of drawers which I have cased from my lovely friend and downline Pat.


I have used pink pirouette and marina mist cardstock along with one of the sheets from the Beau Chateau DSP.  On one side of the paper is Roosters in a frame and the other side is the chicken wire that you can see on the front of the drawers.  I have used Pretty In Pink buttons from the Subtles buttons collection and have adorned them with basic rhinestones.  I punched the owl from Marina Mist and a small piece of the Beau Chateau paper and used some googly eyes to finish it off.

I hope you like and until next time

Happy Crafting

Emma xx

Friday, October 7, 2011

Hello

Hi Guys

Well I have absolutely no idea where this week has disappeared to.  I have had a busy week this week.  On Tuesday I had my first fayre of the season and it went very well, I have had a stinking cold all week and yesterday was my nieces birthday.

I only have a photo of my nieces birthday card to show you as I seem to have mislaid my photos of Tuesdays fayre.

Here is the piccy of Abi's card (not fantastic as taken on my phone)


I have used the lovely Island Indigo and Pool Party along with the Pennant Parade Stamp set.  I have teamed it up with Perfect Punches.  I have used two new punches on this card and they are Petites Pennant Builder and the Lace Border Punch.  I have used the Timeless Type Junior Alphabet sizzlit die to cut out her name.  I added some bling as she has now reached double figures.

I hope you like and until next time

Happy crafting

Emma xx

Sunday, October 2, 2011

Catalogue Link

Hi Guys

How remiss of me.  In my excitement to show you the new products I forgot to give you a link to go and see the new catalogue.

So here it is


If you click on the picture you will be taken straight to the catalogue so that you can have a look at it for yourself.  You will also find it in my sidebar for future reference. 

We also have a brand new system for the hostesses of my future workshops
When you have a party of £150 you now get £25 to spend in the catalogue WHEREVER YOU WANT!!!!  That is right wherever you want.  You can 'buy' hostess sets and with £25 you can 'buy' any of the hostess sets and you are no longer restricted to level one hostess sets.  You are now able to buy any of the sets.  If none of the sets take your fancy then you can choose merchandise out of the catalogue.  

Not only that if you have a party of £300 or more then you can also (but don't have to) choose one item for 1/2 price from the catalogue.

Well if you want to book a party then just email me at emmadaye@sky.com and I will sort it out with you.

I can't wait to hear from you.

Until next time

Happy crafting

Emma xx


Saturday, October 1, 2011

New promise and New Catalogue

Hi Guys

Well I am really really sorry for my absence but as you will know if you follow my blog I have had an awful lot on my plate recently and I haven't really had much of a mojo.

I know I have said this before but I am definately back now and on a mission.

Stampin' Up! Europe launch their brand new catalogue today and what is the best way for you to see lots of different samples from the new catty???  That's right, a blog hop.

We have a fabulous one in store for you today with a total of 37 blogs for you to go and look at.  If you are already on the hop you should have got to me from Keren and you will go on from here to Rachel.

My projects have been made using several different products.  My first product is brand new to the European Catalogue but they have had it in America, Canada and Australia for a while now.  Not guessed yet?  We have finally got material in our catty!!!!! WOOHOO.

I have made a small sewing project which was fairly easy to put together.  It is a mug caddy


I have also used the Easy Events card set to create a little box of notelets to give away to someone


The backing card on these cards is one of the new InColours, Island Indigo.  I am loving the in colours this year they are gorgeous.


Under the Big Top is the next set that I have used.  I have taken inspiration from our latest training day for this card and used buttons for his dumbells.  The Scallop Circle underneath is from the new Perfect Pennants die for the Bigshot.  This die also has 3 triangles on it to make bunting and also another scallop circle for you to cut out.


Finally my last project was the birthday card for my stepdad who is mad on motorbikes.  Again I took inspiration from training for using the glass glitter underneath the bike for the gravel.  I have used the Petite Penants builder punch to create my bunting.  My greeting has been punched with the extra large oval punch then the scallop oval punch cut in half and adhered it behind my oval.

I hope you like my projects and you now pop on over to Rachel to carry on the blog hop.

I promise I will be back really soon with some more projects.

Until next time

Happy crafting

Emma xx

Just incase you get lost on the hop you can come back here and carry on from here!!

1. Lauralou http://airingcupboardstamping.blogspot.com/
2 AlisonP www.craftyalisoninlyon.blogspot.com
3 Glittermum http://www.mygroovystampinup.blogspot.com/
4. Theresa M http://my-next-chapter.blogspot.com/
5. SarahLP http://stampingobsession.com/
6. Sassy Stamper (Elaine) http://www.thesassystampers.blogspot.com/
7. Sarastamper (http://craftingandstamping.com)
8. JJ66 http://jan-crippin.blogspot.com/
9. Evy c http://evyscraftycreations.blogspot.com/
10. DonnaM http://www.head-over-heels-by-dlm.blogspot.com/
11. Scrappydiva http://www.stampin-divas.blogspot.com/
12. Natalie http://www.natalieoshea.co.uk/blog.html
13.Dawn http://www.tartanstamper.blogspot.com/
14. Vicky www.vickylouscorner.blogspot.com
15. Maggie (maggiemae) http://thefineartofstampin.blogspot.com/
16. Julie H (The Crafty Bug) http://www.the-crafty-bug.blogspot.com
17. Elizabeth (Stash Fairy) http://elizabethscraftroom.blogspot.com/
18. Michelle (ShellieStamps) http://michellescraftypaper.typepad.com/
19. Keren. http://www.kerenbaker.wordpress.com
20. Emma (Daisydaye) http://emma-daye.blogspot.com/
21. Rachel (Rachel) http://www.stampingurl.blogspot.com
22. Valerie (valmoody) http://stampingwithval.wordpress.com/
23. Kara (KaraM) http://karascraftycorner.blogspot.com/
24. Sarah (IOW Sarah http://www.stampinsarahiow.blogspot.com/
25. Tracey Rossos http://www.derbyshireducks.blogspot.com/
26. Patricia (Beckscraft) http://stampinbeckscraft.blogspot.com/
27. Sarah-Jane http://cardsandacuppa.blogspot.com/
28. Claire http://stampinupscrapper.blogspot.com/
29. Cupcake http://pinkycardsandcreations.blogspot.com/
30. Kimf http://kimfeecrafter.blogspot.com/
31. carolineskinner http://stampinupandbranchingout.blogspot.com/
32. Emma_H http://www.emma-letsstamp.blogspot.com/
33. Sally - Pink Sky. x http://pinkskysu.blogspot.com/
34. Carolyn http://stampaholix.blogspot.com/
35. Tina http://littlewhitehousecrafts.blogspot.com
36. Hayley (craftydevils) www.mycrafthaven.blogspot.com
37. allyf - http://serendipitypapercuts.blogspot.com

Monday, September 12, 2011

Bentley hotel

Hi Guys

How do you fancy an afternoon of crafting near Lincoln for just £17.50??

Zoe and I are holding a class on Saturday 15th October from 2-5 where we will teach you some different techniques and you will leave with a stamp set to take home. We would love to see you there.

If you would like to come and join us then you can book by emailing me at emmadaye@sky.com or phoning me on 07793972024.

Lastly don't forget that the last chance list is fast dwindling and quite a few things have sold out already and are now gone forever!!

Until next time

Happy crafting

Emma x x

Tuesday, September 6, 2011

Woohoo I am back

Hi Guys

Well I don't know who pinched my mojo but they have now returned it and hopefully I am back on form.

I am back with a Try It On Tuesday challenge and this week it is monotone.  I have chosen to use blues with just a hint of white in my creations.


I have used Baja Breeze, Marina Mist, Bashful Blue and Pacific Point.  Firstly I made a One Sheet Wonder (this is where you take a sheet of card and stamp your images randomly all over it and the use it as a backing sheet).


I teamed it up with Bashful Blue, Marina Mist cardstock and Baja Breeze seam binding ribbon.  The stamp sets that I have used are Greenhouse Garden and Elegant Thank You.

I hope that you like and I promise it wont be as long next time.

Until next time Happy Crafting

Emma xx

Thursday, September 1, 2011

Woop Woop Woop

Hi Guys

Well it is time for the Retired List here in the UK.  This happens every September for Stampin' Up! Europe.

Here is the link for the retired list.  Now all you need to do is go and look at and find out what it is that you will not be able to live without when they disappear at the end of the month, make a list and then email me with it and I will sort your order out for you.

I look forward to receiving your order soon

Until next time

Happy Crafting

Emma xx

Wednesday, August 17, 2011

Not Stamping but ...

Hi Guys

Many thanks for your lovely comments and emails about my husband.  He is faring quite well now but does still get tired quickly.

I haven't done any crafting until today and I forgot to take photos of them but will when the recipient gets the card at the end of the week.

I have however been doing something called Zentangling.  I found a website called www.Zentangle.com  On the site you can find lots of different patterns that you can use to fill in your string and here are some of the Zentangles that I have done (I have not done them the correct size of 3.5", mine are A5).


So far all of my Tangles have included a flower.

I hope you like and until next time

Happy Crafting

Emma xx


Monday, August 1, 2011

MIA

Hi Guys

Well I would like to apologise for my lack of posting over the last couple of weeks but I do have a very good excuse for it.

Just about 5 weeks ago my hubby was diagnosed with bowel cancer which was devastating.  Well 2 weeks ago he had an op to remove the majority of his large bowel and is now on the road to recovery.  I have however been spending a lot of my time at the hospital visiting him and because it was 30 miles away I stayed there all day so by the time I got home I was just too tired to craft.

He is now home so things can get back to normal and I will start posting again soon.

Once again sorry

Until next time

Happy Crafting

Emma xx

Sunday, July 31, 2011

Extra Extra

THIS POST WILL STAY AT THE TOP UNTIL THE END OF JULY PLEASE SCROLL DOWN FOR NEWER POSTS

Hi Guys

Well what a fabulous promotion we have got for you this month from Stampin' Up!

Host a party throughout June and July and you can earn an extra £20 (free) hostess spends when you get sales of £250 or more (see the table below).


Workshop total product sales (before shipping and handling)
Free
Stampin’ Up! merchandise

Extra, Extra hostess rewards 
Free Stampin’ Up! merchandise with
Extra, Extra
hostess rewards 
£250 - £299
£25
+
£20
£45
£300 - £349
£35
+
£20
£55
 £350 - £399
£40
 +
£20
£60
 £400 - £449
£45
 +
£20
£65
 £450 - £499
£50
 +
£20
£70
 £500 - £549*
£60
 +
£20
£80


So what are you waiting for??  Phone me and book your party today.

Until next time

Happy crafting

Emma xx

Tuesday, July 5, 2011

Flower Power

Hi Guys

Well this week over on Try It On Tuesdays we have been set the challenge of flower power and I chose to use a flower made from punches.


I have made this using the Build a Petal Punch from this years mini catalogue.  Made with Regal Rose and Old Olive cardstock.  Backed onto Vintage Wallpaper DSP and Rose Red Cardstock.

I have used the Curly Cute stamps for the greeting.  It is a Birthday card for my hubby's Grandma who is 81 years young.


Don't forget to go over to Try It On Tuesdays and look at my teamies work.

I hope you like and until next time

Happy Crafting

Emma xx

Friday, July 1, 2011

Stampin' Up! Taster Event

Hi Guys

Well it is time for our second annual Taster Event and we would love for you to come and join us.


So what are you waiting for??  Phone us today to book your place.

Emma xx

Colour Coach Blog Hop

Hi Guys

well if everything has gone well then you should have come here from the lovely Alison and will carry on to the fabulous FrankieSue.

I have chosen to use the colour combo Cajun Craze, Baja Breeze and Basic Grey and here is my project.


I have done a trio of cards using the Faith and Hope set which Stampin' Up! are donating £1 of every sale to Cancer Research. 


Card 1


I started with a Very Vanilla base for all three cards.  To this one I added a mat of Baja Breeze that I have stamped with the text stamp to the right hand side of the mat.  I have then added some Seam Binding down the edge of the wording.  I have stamped the butterfly onto vellum and then embossed with clear embossing powder.  Add a few pearls and voila.

Card 2


I have stamped the Hope stamp all over the Cajun Craze and then ran through the bigshot with my Vintage Wallpaper embossing folder.  Distress the edges.  Add a punched shape in baja breeze and then a bow made from the seam binding and voila.


I have used the flourish stamp in the set and my Stamp-a-ma-jig to position it and stamped it around the page and then cut around it.  I have stamped the text stamp onto Cajun Craze and distressed the edges of that too.  Again using vellum I have stamped the butterfly using Cajun Craze (stamped off) and added pearls.


I have used my Scallop Envelop die to make my box but I needed it to be wider than normal.  To do this you need to fold a piece of card stock in half and place on your die where you want the halfway point to be and run through your bigshot.  I have shown this in the photo below.

To cover the fold marks I have added a matting layer and then some Seam Binding around the top of the box.

Now don't forget to go over to FrankieSue's blog to see what she has in store for you.

Thanks for looking and until next time
Happy crafting

Emma xx