A Huge Thank You

Thanks for taking the time to visit my Stampin' Up! blog. I would love for you to either leave a comment or follow my blog and then I can come and see your work and leave comments for you too.

Emma xx
Independent Stampin' Up! Demonstrator in England UK. All things Stampin' Up for card making, scrapbooking, wedding stationery, gifts, card making classes, scrapbooking classes, gift making classes.
http://picasion.com/i/1TioE/

Monday, December 28, 2009

Another one for Fiskarettes

Hi Guys

Now that Christmas is over it is time to things crafty that are not RED, GREEN or GLITTERY.

This is a little tutorial to make a box (I found this on the net and apologies but I can not remember where I got it so apologies for
that).

Here is a picture of the pattern.
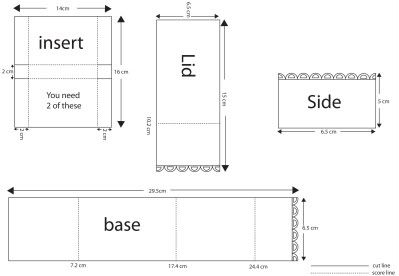


I hope I have done it right. If you click on it you should go to a bigger version.

Materials you need

Card in two complementary colours
Patterned paper
Ribbon (about 16")


Cut all of the pieces and score as directed.

Starting with the inserts, stick them to the base and fold up and stick the sides too. Punch the end with a fancy border punch.

Adhere the lid to the underneath of the scalloped flap to complete the lid.

Taking ribbon of your choice, cut it in half and adhere one each to the side pieces. Now stick these to the side of the box.

The flowers

It is amazing what you can do with a scallop circle punch. Both of these flowers were made with a scallop circle punch.

The top flower

Punch 6 circles and cut into the middle of them, going further into the middle of the circle as you go.

Take each 'petal' and curve it around an embossing tool. When you have done all 6.

Start with the one that has the biggest 'middle' bit and stick the next one on top of it, carry on 'til they are all stuck together.

Taking a 1/8" circle punch, punch a hole in the middle and add a brad to pretty it up.

Bottom Flower (I got this from Monica and Stamp With Us)

- This again was made using a scallop circle punch.

- You need 8 circles (4 of each colour). (You can cut them like the first flower or do it plain like I have)

- Lay them flat on your cutting mat and spritz them with water on both sides.

- Scrunch them up and then blot them with kitchen paper.

- Now straighten them out and place alternately one on top of the other. Take four and punch with the 1/8" circle punch and again with the other four.

- Place them all together and place a brad in the middle and leave to dry

When the flowers are dry they will 'crisp' up and keep the shape that they have been 'scrunched' into.

I hope you like this and understand the directions.

Until next time

Happy crafting

Emma xx

Sunday, December 27, 2009

The Stamp Man Blog Hop, Candy, and Award Event


The Stampman are hosting this blog hop. The reason for this is not to create a new project, (because if you are like me you just haven't got the time to do it at the moment), but to showcase a project that you are proud to have done during 2009 and then you can place this award on your blog too.

You should have come here from the lovely Teri's blog and from here you will go to the lovely Lisa's blog. If you have come straight here then you can go to The Stampman and start from the beginning.


The project that I am going to showcase is one that I did really recently. It is my pheasant and this is for two reasons. Reason 1 is that I have finally mastered brayering and it is now a technique that I love doing, reason 2 is the fab trick that I learnt at Stampin' Up! convention about using a piece of felt as a stamp pad. Use a piece of felt and stamp the image with stazon ink so you have the outline. Using this as a guide, go over the image with different coloured re-inkers until you have finished colouring your 'image' and then use this as a stamp pad and you will get a fabulously coloured image without the hassle of using pens and then huffing at the end of it. The felt 'stamp pad' is also good for about 10 - 15 stamps as well.

There are lots of prizes to be won. The one that I have to tell you about are a selection of Moonglow products. I have some moonglow sprays and they are lovely. In order to be in with a chance of winning any of the prizes on this blog hop you need to leave a comment on ALL the blogs you visit including the Stampman blog. When you have all of the letters email them to thestampman@btconnect.com

This hop is from today and will carry on til midnight GMT 3rd January 2010.

Good luck and don't forget to comment on every blog to be in with a chance of winning. Now go and see Lisas blog.

My Letter by the way is N. Good Luck.

Until next time, happy crafting

Emma xx

Thursday, December 24, 2009

Some more Christmas Cards


Hi Guys

This year has been fun for making Christmas cards, firstly the ones that my hubby made as seen in previous post, then the ones for my stamp class ladies and now these for the kids.

We wanted to do something a bit different for the kids, so out came the punches and some thought and this is what we came up with.


from the top left (in case you cant see what they are), we have a penguin, Christmas tree, a robin, an angel, Father Christmas, a snowman and last but not least a polar bear. What a polar bear and penguin have to do with Christmas I don't know, but it seemed like a good idea at the time. We needed 7 different christmassy things and polar bear and penguin came into the equation.

They are all made from a variety of Stampin' Up punches.

I hope you like

Until next time

Happy Crafting and a Happy Christmas

Emma xx

Watch out for this


This is happening

Keep watching and you will find out more!!!

Until next time

Happy Crafting

Emma xx

Tuesday, December 22, 2009

Christmas Cards

Hi Guys

Well I hope that everyone has received their cards by now so that I can show them to you. Many of you will find this very hard to believe but Andy, my darling hubby, made the cards with the Christmas trees on. He stamped the image, coloured with prismacolour pencils, added stickles, matted and layered them and then asked me to help him with the ribbon. I am really proud of him and I think that he has done a fab job and secretly (I think that he is a closet crafter and enjoys it really).


The stamp is from Stampin' Up! Fun and Fast notes. Real Red and garden green card stock.

Until next time

Happy Crafting

Emma xx

Sorry for being a bad blogger


I know that it has been a while since my last post but I have not had internet. I have quite alot to show you as well.

Lets start with Tuesday Taggers. Let it Snow is the last challenge until 2010 as the Design Team have been given a holiday!!! Woo Hoo:).

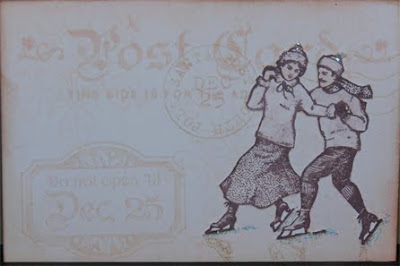
My take on this is an ATC (I know, I know. It is something that I do rarely) as it suited the stamp set that I used. I have used Stampin' Up! Winter Post. I have used Blush Blossom to stamp the postcard stamp and Do not open sign. To stamp the post mark I have stamped off the stamp first and then placed it on the card. I have sponged around the edge with blush blossom and close to cocoa.

I have stamped the couple in Close to Cocoa and then used the blending pen to pull the colour in to the image.

This has all been done on Very vanilla card stock. I have added dazzling diamonds to the bobbles on the hats and also under the skates. If you look closely you can see a shadow underneath the skates. This is done by stamping your stamp on the smooth side of your imaging sheet (part of your stamp-a-majig) placing it underneath your image and rubbing to transfer the image to your design.

I hope you like

Until next time, happy crafting

Emma xx

Wednesday, December 16, 2009

A Secret Santa pressie

Hi Guys

At the craft club that I run we have a social twice a year. Well last night was our Christmas social. We had fun and games and food and cakes.

We always have a secret santa at the Christmas social and this year I decided to make my pressie. I have been wanting to try stamping on candles for ages and just never found the time, well I found the time for these and then I made some more afterwards but wrapped them up without taking photos and have already given them out.

Here are the ones that I took photos of. The candles were cheap ones (£1) from Asda, I finally found some tissue paper in Rymans, (I can't believe how hard it is to find tissue paper). For the required wax paper I used greaseproof paper.


I have used two stamp sets for this, Circle Circus and Trendy Trees, the inks that I used were Old Olive, Close to Cocoa and Garden Green. I stamped them onto the tissue paper and cut as close as I could with my scissors, tacked them to the candle with some snail and then wrapped the greaseproof and used my heatgun to 'melt' the wax until I saw it change. Stopped heating and then smoothed over the greaseproof with my hand and voila, a stamped candle.

Hope you like

Until next time

Happy crafting


Emma xx

Fiskarettes


Hi Guys

Here is a card that I put together for Fiskarettes. I have used a border punch and then used the punched out pieces to do the decorations down the side of the card. I have also used a scallop circle punch to make the flowers. The centre for the punch is a 1/2" circle from Stampin' Up as is the greeting stamp. The little stamped images around the top card layer are also Fiskars.


I hope you like and until next time

Happy Crafting

Emma xx

Tuesday, December 15, 2009

Tuesday Taggers - Jolly Old Saint Nick


Hi Guys

Todays challenge on Tuesday Taggers is 'Jolly Old Saint Nick'. The girls on the DT have done a fabulous job again and there are some lovely examples and very varied again. Our guest designer Suzanne has surpassed herself, even though she says that she was very nervous about doing this.


My entry is some punch art. They are boxes of Lindt chocolates that are for spot prizes at my clubs Christmas Social tonight. I have made them in to Santa by using what seemed like hundreds of punches. Seriously though it did take 9 seperate punches to make these. They go like this (all SU! punches)

1 3/4" Circle = head (Blush Blossom)
Small Tag = Hat (Real Red)
1/2" Circle = nose (Blush Blossom)
Boho Blossoms = Pompom (Whisper White)
Scallop Oval = Beard (Whisper White)
1/4" Circle = Eyes (Whisper White)
Scallop Circle = Hair (Whisper White)
1/8" Circle = Eyes (Black)
Scallop Edge = Trim on hat (Whisper White)

His cheeks have been coloured with Stampin' Pastels. His coat is made from a Real Red rectangle with the top corners clipped, a strip of black for his belt and some gold for his belt buckle.

I hope this makes sense to you and you have a go at doing them. If you do, please let me know so that I can come and have a look.

Until next time

Happy Crafting

Emma xx

First things first

The winner of my Reindeer Journal is


the wonderful Georgina. Congratulation Georgina, if you could let me have your postal address by email here emmadaye@ntlworld.com.

Emma xx

Blog Candy - This will stay at the top. Please scroll down for new posts


I had so many lovely comments about my reindeer journal that I have decided to give it away as candy. So if you want to win this


- Then leave me a comment,
- post on your blog

and I will announce the winner on Tuesday 15th of December and then it will be with you in time for Christmas. (if you don't have a blog you can still enter by leaving your name at the bottom, anonymous will not be counted).

Good Luck

Emma xx

Friday, December 11, 2009

Guess What is coming???


No not just Christmas. From 30th December you can

Sale-a-brate with me

This is just a teaser. I will be posting some sneak peaks over the weekend. So keep looking and you will see them. I will also be posting some other offers that are just from me.

So until next time

Happy crafting

Emma xx
Tuesday, December 8, 2009

Better late than never ...

... a winner for the image I used for the blog hop on Sunday.


So without further ado. Number 26 is IRIT SHALOM. So Irit if you would like to email me your email address I can send the image on to you.

Emma xx

Monday, December 7, 2009

Tuesday Taggers - The Christmas Tree


Hi Guys

This week on Tuesday Taggers we have been challenged to do 'The Christmas Tree'. I have chosen to do some teabag folding and an easel card. I know that easel cards have done the rounds and I am probably one of the last to do them but hey I like them and here is my card.


I have used Old Olive and Chocolate Chip Designer Paper, Very Vanilla card stock, So Saffron grosgrain ribbon and the stamp sets Wondrous Gift and Wonderful Words. I have inked around the edge of the Very Vanilla Card stock with Old Olive ink.


Here are instructions on how to fold the squares (not my own instructions). I started with 3" squares for my project.

I hope you all like, please leave a comment if you do so I can visit you.

Until next time

Happy crafting

Emma xx

Saturday, December 5, 2009

Hi Guys

From 0900 this morning until Tuesday (the start of the next challenge), Tuesday Taggers are on a mission. This mission is simply a blog hop to celebrate the birthday of St Nicholas, who in Europe is also known as Father Christmas and celebrate the Birthday of fellow Tuesday Tagger Avril.

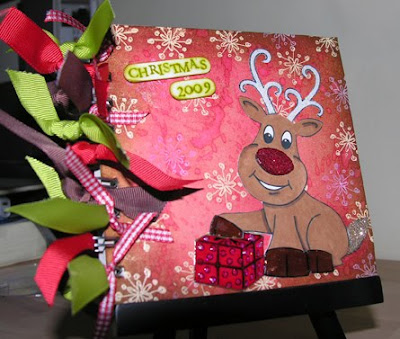
You should have come here from the lovely Debbies blog. For this we have chosen an image from Teri's website and used it to create our entry. Because it is for Christmas I have chosen a reindeer with pressie.


I have teamed this up with lots of yummy SU! goodies. I have used the On Board Journal with Very Vanilla cardstock that I have sponged with Real red ink and gone round the edges with Old Olive ink. I have used the faux bleach effect by flicking water on my inked up piece to create 'bleached' out spots.

I have coloured the image with my Stampin' Write markers and added fine galaxy glitter and dazzling diamonds to give bit of bling to it. I have also used the snowflake from the Wondrous Gift stampset and embossed with clear powder and also with white craft ink.


I hope you enjoy this hop and will come back again soon.

The letter you need to collect from me is D. So leave me a comment and hop on over to the lovely Lyn.


Until next time

Happy Crafting

Emma xx

Wednesday, December 2, 2009

Hi Guys


Well I promised sneak peaks of the cards that I would be teaching today. I didn't get them done but here they are now. I will be teaching theses cards again on 16th December for those of you who couldn't attend today or need last minute hand made cards.


So ladies and gents if you live in the Grantham area and would like to make these cards then we will be doing a £5 for 5 card event on the 16th December. For an extra £1 we will be doing a gift box that you can put smellies or anything else you want in.

Until next time

Happy Crafting

Emma xx

Tuesday, December 1, 2009

Tuesday Taggers - Christmas Carol


Hi Guys

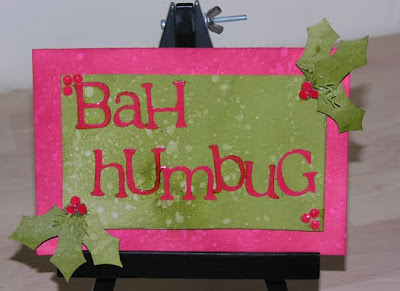
Well when I first saw this challenge title I wondered what on earth I could do for this. In the end though it took my hubby to convince me of what to do. He didn't do this by telling me what to make or what carol to choose, he did it by just being his lovable self. He is one that believes that Christmas should start on 24th December and end on 26th December. With this in mind here is my piece of work for this weeks challenge. I didn't choose a traditional Christmas carol like Janet did, or go with a picture of carolers singing, no instead I went with Charles Dickens 'A Christmas Carol' and Bah Humbug.


I have used, (believe it or not), Real Red ink and Old Olive ink and coloured the card with sponges. I have then used water and flicked it on to the card stock to achieve the faux bleach effect. Unfortunately I don't have a stamp set small enough to do the text so I cut this out on my machine. The holly leaves are cut out by hand, as are the berries. The berries have been made by punching into Real Red cardstock with the crop-o-dile. I have finished off the berries and letters with Crystal Effects.

Well until my next post happy crafting.

Emma xx

Tuesday, November 24, 2009

Tuesday Taggers - Festival of light


Hi Guys

Over at Tuesday Taggers this week the challenge is the festival of light. With last weeks post about punch art, I have used my punches on this one again.


I have used four rectangles of whisper white card stock. At the top of 2 of the rectangles I have used the large oval punch on its side and punched just less than half away. I have used mellow moss ink to highlight the candles to give them some depth and then stuck that layer onto the other rectangles. The flames are also cut with the oval punch and then shaped to give them the appearance of a flame. I have reverse masked the flame (cutting the shape of the flame out on post it note and the cutting the middle bit out and using ruby red ink to colour it in with a dauber). The border has been cut using the Eyelet border punch. I have matted and layered with Spiced Cider DSP. The pattern on the candle and the sign have come from the 'Spotlight On Christmas' stamp set from SU!

I hope you like.

Until next time happy crafting

Emma xx

Tuesday, November 17, 2009

Tuesday Taggers - Red, Gold and Green


Hi Guys

This week on Tuesday Taggers we have been challenged to use Red, Green and Gold, we were then told that we could make it Christmassy or not. I thought about making my entry so that it was not Christmassy but it didn't happen.

I am doing punchart with my class this evening so I made something to go with the theme.


Everything I used to make this card is from Stampin' Up! The card stock is Old Olive, Whisper White, Real Red. I have used the stamp set Wondrous Gift, Whisper White grosgrain ribbon and Scallop circle punch.

I punched 5 times from Old olive card stock and cut them into quarters. I have then placed them to look like a tree and then matted and layered it.

I hope you like and until next time

Happy Crafting

Emma xx

Monday, November 16, 2009

OMG I have been featured on...

..... Late Night Stampers for my Pheasant card in my last post. This is the first time that I have ever been showcased by another website and it is also for stuff made with SU! goodies.

Thanks very much Kelly.

Emma xx

Saturday, November 14, 2009

Just a few.... Edited

.... cards to leave you with for the weekend. I have used a number of different stamp sets for these. I have decided though that I need and want some more greeting sets as I struggled to find one for the pheasant card so had to resort to rubons.

Cards one and two are brayered backgrounds and I will explain more after the weekend.

This card is made using the Autumn Days stamp set from Stampin' Up. To do the brayering I used Certainly Celery, Green Galore, Bashful Blue and Not Quite Navy inks for SU! I have used the retired DSP Haiku and matted it with Close to Cocoa and More Mustard c/s. To stamp the foliage around the page I have used More Mustard and Old Olive.


I don't remember what stamp set I used on this one. The inks used for this were Distress Inks.

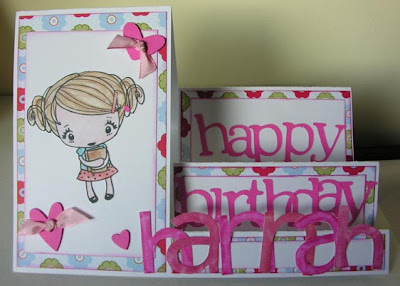
This card was for my cousins 13th Birthday. I cut the Happy Birthday with my Cricut. Hannah was stamped with Big Deal Alphabet using Pink Passion and Pixie Pink ink from SU! The heart buttons were made using the SU! Heart to Heart punch with Pretty In Pink Taffeta ribbon threaded through them. Again I am using retired SU! DSP. The stamp is a Greeting Farm stamp.


Until next time

Happy Crafting

Emma xx

Monday, November 9, 2009

Freebies for anyone????

Well Stampin' Up! have gone and done it again. They have given us another fabulous promotion.


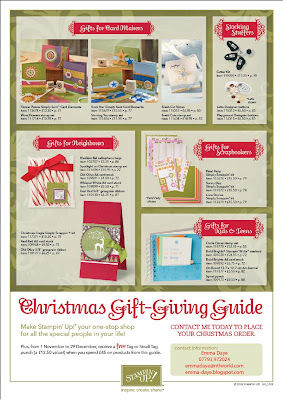
Look at all of the gorgeous product on this flyer and spend £45 on any of the product from this flier and you will earn yourself a free tag or small tag punch, (worth £12.50), absolutely free. There is card stock, scrappin' kits, punches and stamps for you to choose from amongst other things. I know that you will be wanting to get lots of these things but you have only until 29th December to order and make the most of this offer.

Here is a full break down of all the products.

Stamp sets
Spotlight on Christmas - £18.95 (p22)
Fresh Cuts - £18.95 (p53)
Circle Circus - £23.95 (p55)
Starring You - £11.95 (p77)
Wow Flowers - £10.95 (p77)

Simply Scrappin’® kits and Card Elements
Rock Star Simply Sent Card Elements - £12.50 (p77)
Flower Power Simply Sent Card Elements - £12.50 (p77)
Sunny Day - £15.50 (p78)
Christmas Jingle - £15.50 (p79)
Petal Party - £15.50 (p79)
Love Stories - £15.50 (p79)

Cardstock
Whisper White A4 card stock - £5.50 (p71)
Real Red A4 card stock - £4.50 (p72)
Old Olive A4 card stock - £4.50 (p72)
Bold Brights A4 card stock - £6.75 (p72)
Fresh-Cut Notes - £6.95 (p80)

Ribbon
Old Olive 5/8" grosgrain ribbon - £6.25 (p87)
Real Red 5/8" grosgrain ribbon - £6.25 (p87)

Accessories
Latte Designer buttons - £6.50 (p83)
Playground Designer buttons - £6.50 (p83)

Tools
Bold Brights Stampin’ Write markers - £24.95 (p72)
Spiral punch - £8.50 (p88)
Cutter Kit - £13.25 (p90)

Miscellaneous
Medium flat cellophane bags - £3.25 (p80)
On Board 12.7 x 12.7 cm (5”) Art Journal - £5.50 (p82)

As usual you can email me or phone me to place your order at emmadaye@ntlworld.com or 0793972024. If you place a qualifying order with me then I will give you free postage.

I am also doing a wish list this year. Simply download the list on the left hand side of the page, print it out, fill it out and hand it to everyone who may buy you a gift. Simply get them to phone or email me and I will do the rest.

I look forward to receiving any orders that you want me to place.

Until next time

Happy crafting.

Emma xx

Sunday, November 8, 2009

Stampin' Up Convention 2009

I have just spent 3 lovely days in Frankfurt at the first European Stampin' Up! convention. I have photos to share but I am still in Germany so I will update when I get home tomorrow.

I just have to say watch this space as there are going to be interesting things happening in my life.

Until next time

Happy crafting

Emma xx

Tuesday, November 3, 2009

This last weekend


This last weekend I went away to North Yorkshire to meet up with people that are both crafters and friends. I have known most of them for only one year and it feels like I have known them for years. We played and admired each others work and taught each other lots of new things that we had learnt since we had seen each other last.

I made some stuff but not much as most of it was spent chatting and catching up with everybody.

Here are the things that I made.


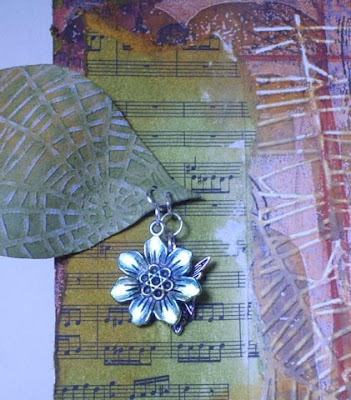
Well one thing anyway. I made a book cover which included book pages, stamps, resist embossing, grunge paper, brads, stampbord, metal and a handle from B&Q, yep you don't need to get everything from a craft shop to put on your work.

I really enjoyed doing this piece of work and it took a while to do but I got there in the end.

I hope you like and until next time

Happy crafting

Emma xx


Tuesday Taggers - Handbags and Gladrags


Hi Guys

When I chatted to Janet from Tuesday Taggers she thought that we would go with the party season and the little black dress. Not for me I am afraid, I have done a handbag and shoe for you to look at.

My shoe pattern and the flower on the shoe are from online classes with Stamp with Us where the lovely Monica showed us how to make them. The handbag was with the same class but no pattern so I just made it up.


The flowers were made with a scallop circle punch, the ribbon is from my stash.

I hope you like this.

Until next time

Happy Crafting

Emma xx

Friday, October 30, 2009

Winner of my Blog Candy

Hi Guys

Today is the day for drawing my candy. Firstly I would like to say thank you to all of you who looked at my blog, listed it on their blog and as well to those of you who became followers of my blog. I will now be able to look at your work.

In order to choose my winner I used the random number generator at random.org. I got my hubby to do it to make it even fairer


Unlucky for some but lucky for this lady, Number 13 was the number chosen. Going down the list number 13 is JanJ. So Jan email me your address and I will get your goodies posted off to you.

Once again thanks to you all

Until next time

Happy Crafting

Emma xx

Thursday, October 29, 2009

Blog Candy 4000 hits

This post will remain at the top until 29th October. Please scroll down for further posts.


Hi Guys

Well I have promised it for a while but here it is. My blog candy. I am sorry for the delay.


There are some rock - a - blocks, Cosmo Cricket Ribbon, Stampin' Up! Flower Fusion, Doodlebug Sugar Coating and some Kay & Co stickers.

I would like you to post a link on your blog advertising my candy and I will pick a winner by random generator on 29 October.

You will also find some surprise items in the package as well.

Thanks for looking and good luck

Until next time happy crafting

Emma xx

Tuesday, October 27, 2009

Tuesday Taggers - Bursts of Colour


Hi Guys

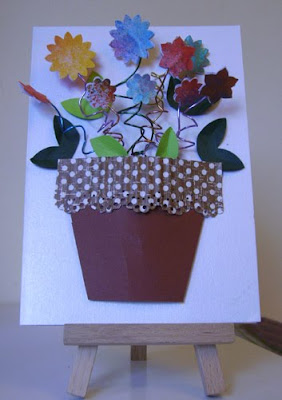
Well another week has passed and I am not sure where they are going. This week for Tuesday Taggers we were asked for Bursts of Colour. I really didn't want to do the obvious and do fireworks so instead a flash of inspiration came to me on Friday and I sprayed some white card with shimmer sprays that I made with mica powders, re-inker and water.


I punched it with boho blossoms punch from SU! and attached them to some crafting wire which I have twisted round a pencil. My leaves are punched from green card with the 5 petal flower punch also from SU! My plant pot is made from brown card stock and I have used a border punch that has been put through a paper crimper just to add some dimension.

I hope you like and until next time

Happy Crafting

Emma xx

Tuesday, October 20, 2009

Tuesday Taggers - BOO!!


Hi Guys

Well this week on Tuesday Taggers we are looking for all things that go bump in the night. The DT have done some outstanding work again. For my entry though I have not gone the traditional with pumpkins and ghosts.

I have just done some artwork. My card started with me using a background stamp from Mr Tim Holtz that I brayered with gesso and stamped onto the card. When this had dried I then started inking with distress inks peeled paint, spiced marmalade. I then over stamped it with more stamps from Tim (and made a mistake) so out came my book (I bought one just to rip up which people who know me will know that this has taken me such guts to do) and I placed a ripped page on the bit I made mistake on. I then inked this up with more spice marmalade and peeled paint. I went round the edge with vintage photo to darken it up a bit. I free cut a wing from grunge paper and coloured it with distress inks again. I then manipulated it so that it is 3d. Before I attached it I ran my artwork and my wing through the Bigshot with an embossing folder to add the spiders web. I distressed this with an emery board to take the top of the paper off. I used some jump rings and added some charms. The quote at the bottom of the artwork is 'Once a word is spoken, it flies, you can't catch it'. I forgot to say about the candle. I have used an image from Lisa's Altered Art. I then did the same as if you are adding a stamped image to a candle and used some waxed paper around the candle to keep the image in place and then heated it with my heat gun and then it stuck.


As promised tomorrow I will be launching my blog candy, so watch this space.

Until next time happy crafting and I hope you like it.

Emma xx

Tuesday, October 13, 2009

Tuesday Taggers - Digi Week


This week on Tuesday Taggers is slightly diffferent to normal (not that we are normal on TT's). One of the Design Team, Teri, also designs digital stamps (and has a site called Delicious Doodles), so this week we all had the same image a little harvest mouse and we all did something completely different.

Here is my take on the little mouse

I coloured my mouse with a mixture of copic, pro and tria markers and then cut it out. I have coloured the background with Ranger Distress Inks and cut and dry pads. I started with Tattered Rose and went all over the paper. I then used Milled Lavender and Dusty Concord going in a little less in each case. I then blended them by going over with the Tattered Rose again. The stamps are new ones from Stamping Up! called Autumn Days. I have stamped them with Vintage Photo distress ink. I distressed the edge of the card with a thread cutter and then 3d'd them onto the card base. I also used ribbon from my stash to jazz up the side.

I hope you like and until next time

happy crafting

Emma xx

Monday, October 12, 2009

Look at this amazing offer


Blog candy at Crafters Kitchen, only a bloomin' QuicKutz Silhouette up for grabs. How fab is that. All you have to do is link from your blog (they are checking) and enter your name on their blog.

Good luck

Emma xx

Friday, October 2, 2009

More Samples for Sir Stampalot

LONG POST WARNING

I have done some more samples for Sir Stampalot and you can see these on their website along with samples from lots of other hugely talented bods.


This one, above, is coloured in with distress inks by Ranger and a water brush. Although you can't see it very well I have added a bit of bling to his collar with self adhesive gems, the dots on the bag have been accented with glossy accents. The stars have been coloured with sakura gelly roll glaze pen. I have used Daisy Bucket papers and Bazzill card stock to mat and layer the card up. I have used doodlebug rubons for the sentiment.


I have coloured this one with blendable pencils and sansodor mineral oil. I tend not to use blending stumps because when I first started they were very expensive and I could not afford them so a friend of mine showed me how to blend with skewers/cocktail sticks and cotton wool. I twist the skewer into the cotton wool so I have a thin layer on the stick. I then dip this into the oil and get colouring. I will do a tutorial on this in the next couple of weeks. Again I have matted and layered with Daisy Bucket papers, Bazzill card stock and doodled around the edge with a brown pen.


My favourite colouring medium has got to be Distress inks. I didn't start colouring with them until very recently after seeing one of my friends, the lovely Sara (who has yet to get a blog but that will all change very soon), colour with them. I love the effect that they leave and that you can water colour with them, distress with them, edge with them, grunge with them and lots of others that I have yet to discover. Daisy Bucket papers, nesties and bazzill card stock have been used again.


No this one has been coloured with Cosmic Shimmer powders and paints. I have used Daisy Bucket papers and doodling to finish this one off. The ribbon is two pieces, one thin one running along the card and a slightly thicker one to tie the knot. The dots around the image are the card candy sold by craftwork cards.


No this card is coloured with Cosmic Shimmer paints/powders again and it is not the colouring that is the bit that I am really chuffed with on this card but the border around the image. I have used the doily border punch from Martha Stewart in a 12" piece of Bazzill cardstock. I have then ran it through a ribbler/crimper. This then changes the properties of the cardstock and makes it bendable, if that is a word. I then bent it around the circle to give me a border to match my border on the card. I have ruffled my ribbon by pulling a thread from the middle of the ribbon, I then stuck it down with double sided tape. I have made it slightly longer than that of the card as a point of interest.

Sorry for the length of the post but I needed to let you know how I had done all of the different cards and techniques.

So until next time

Happy crafting

Emma xx

Thursday, October 1, 2009

Stampin' Up! Brand New Catalogue

Hi Guys

The new Idea Book and Catalogue has gone live as of today and boy oh boy is there some fabby new stuff in there. I have had some stuff through already and will post some samples in the very near future.

There is a link to the new Catalogue on my sidebar.

Until next time, happy Crafting

Emma xx
Tuesday, September 29, 2009

Tuesday Taggers - Trees

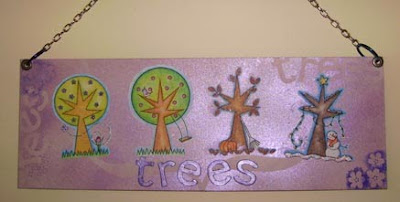
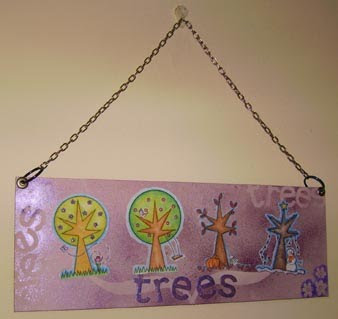
Trees is the order of the week over on Tuesday Taggers this week. I have made a wall hanging. Firstly I found some digital images of trees and these were the ones I liked best. I used prismacolour pencils and sansodor to colour them in. Instead of using paper stumps I use a cocktail stick with cotton wool wrapped around it.


I have used Tim Holtz masks to do the flowers in the corners, I stippled over them with acrylic paint. The other masks were chipboard which I placed on the back board and sprayed with Blonde moments pearl powders mixed with water.

The chipboard letters that I used as a mask then made it onto my board as an embellishment.


To hang it up I added Stampin' Up eyelets, with book rings to hold the chain on. The chain is from B&Q.

I hope you like and until next time.

Happy Crafting

Emma xx