A Huge Thank You

Thanks for taking the time to visit my Stampin' Up! blog. I would love for you to either leave a comment or follow my blog and then I can come and see your work and leave comments for you too.

Emma xx
Independent Stampin' Up! Demonstrator in England UK. All things Stampin' Up for card making, scrapbooking, wedding stationery, gifts, card making classes, scrapbooking classes, gift making classes.
http://picasion.com/i/1TioE/

Tuesday, June 29, 2010

Bus Number 2!!

Hi Guys

If you read yesterdays post you will know what I am going on about.

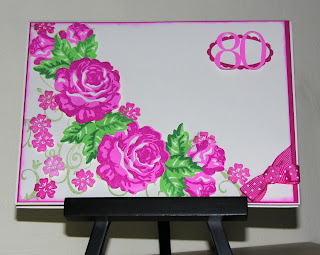
Here is card number 2 in 2 days.  It is a birthday card for my hubbys lovely Grandma.  I am safe posting this on the 'interweb' as she does not have access or any idea on how to.


I have used Baroque Motifs in the background and the little flower from A rose is a rose in the foreground.  I have then stamped and cut out the full bloom and the bud and layered it up on the card.  The colours I used are Pixie Pink and Melon Mambo for the roses.  For the leaves I used Certainly Celery and Garden Green for the leaves.  I have used the School Book Serif Numbers for the eighty stamped in Melon Mambo.  I have layered these on Very Vanilla and Melon Mambo.  I have done a bow in Melon Mambo polkadot ribbon in one corner.

I hope you like and until next time

Happy crafting

Emma xx

Tuesday Taggers

Hi Guys

I know that it has been a long time since my last post but it is like buses, nothing comes for ages and then 2 turn up at once.

Firstly today I am going to show you my Tuesday Taggers card.  This week the theme is Weddings which has been chosen by the lovely Pat and we are sponsored by Craft Barn.


I have used the Bride papers from SU! and have coloured with Pretty in Pink and Bashful Blue using my brayer.  Roll over one way and turn it through 90˚ and roll over again, keep doing this until you have gone all the way round.

I have punched two holes at the top of the card and threaded through Bashful Blue and Pretty in Pink taffeta ribbon and then tied in a knot.  I have used some lovelies from my pretties kit just to jazz it up a bit.

The birds have been made by using the 2 step Bird Punch from SU! in the same colour way and just switched the wings over.  When you are punching out the wings remember to place the card in upside down for one side otherwise you will end up with wings going the same way.  I have backed this all onto Very Vanilla card stock.

Well until next time

Happy Crafting

Emma xx

Wednesday, June 23, 2010

Bad Blogger

Hello All

Well what a bad blogger I have been.  I have had a lot of upheaval in my life of late and I have just not had the energy to come on here and post.

I would like to thank all the wonderful ladies that came to the weekend at Alford run by ZoĆ« and myself.  I had a fab weekend and feel fully refreshed and ready to go again.

I am away at my MIL at the mo and if I get chance to do anything then I will post but if not it will be at the weekend.

Until next time

Happy crafting

Emma xx
Monday, June 14, 2010

Thank You

I would just like to say thank you to those who came to my open house yesterday.  I had a lovely time and it was great teaching some old tricks and some new techniques.


I only hope my next one will be just as successful.

Emma xx

Tuesday, June 8, 2010

Open House

Hi Guys

How do you fancy an hour or so of fun, stamping, tea, coffee, biccies and me?  If the answer is yes then get yourself to Long Bennington Village Hall on Sunday 13th June (this weekend) at any time from 1pm til 4 pm.

We will have make and takes and you can look at the product and try things out before you buy them.

If you fancy coming then I look forward to seeing you on Sunday.

Emma xx

Monday, June 7, 2010

A new venture for my customers

Hi Guys

I should have done this last week and got waylaid.  The Tantalizing Stampers (of which I am a part) are offering a loyalty card.


From today you can download a loyalty card and for every £25 you spend on product you can earn a token which you can record on your loyalty card. For every 10 tokens you will earn a stamp set of your choice to the value of £20. Each token will be valid for 12 months. Stampers Clubs and Techniques Club members are eligible for this scheme, but they must maintain their commitment to club orders. It is your responsibility to complete your card and notify me when you have filled it. I will check it against my records and will order your stamp set. Orders cannot be combined for example if you spend £53 you will get 2 tokens, but your next order of £47 will earn 1 token.

I'm really excited about this on your behalf as it will generate lots of freebies for all of you.  Enjoy shopping and don't forget the new colours and products that are available and if you want to stock up on retiring colours before they disappear in the rush please choose them now!

The loyalty card is on the side bar for you to down load.

I look forward to getting all of your orders

Emma xx

Sunday, June 6, 2010

New Product Blog Hop

Hi Guys

To celebrate the fact that we have 11 new products (all the razzleberry, mambo and suede) us SU! demo's are having a blog hop

You should have come to me from Abi.  If you have then you are on the right track.  If you want to start at the beginning then you need to start here at Caz's.

For my creation I have decorated a mirror.  I covered the mirror with primer so I had a good base, (I did this with a baby wipe so you get a nice thin coat, you can always add more)


I then used a dauber to apply melon mambo and rich razzleberry to the frame.  It was a bit bright so I just went over it with primer again to knock back the colour a bit.

To put the tiles on the front of the mirror, I have cut a cereal box into 2 different sized pieces, 3 7/8" x 3 7/8" and 2 3/4" x 3 3/4", I cut 8 pieces of each to give some depth.  I have then cut Whisper White CS to the same dimensions.

Using daubers I coloured the WW card stock with Melon Mambo and Rich Razzleberry.  I used Soft Suede on the edges to darken them a bit. I have stamped with Live Your Dream and then used sticky strip to stick them to the mirror.

For my second project I used another cereal box to make a coaster book.  I cut the coasters at 3 1/2" x 3 1/2".  I covered half with card stock and the other half with Cottage Garden DSP.

Using WW card stock I cut 3 pieces at 3" x 3" and used the rounded tab punch to make pull tabs for you to journal on.


I have also covered some of the on board So Tweet shapes and added them to the front of my book.

I hope you have enjoyed my little creations and now to continue the blog hop you need to go to Heather and see what fab creations she has for you.

Until next time

Emma xx