

Hi Guys
Now that Christmas is over it is time to things crafty that are not RED, GREEN or GLITTERY.
This is a little tutorial to make a box (I found this on the net and apologies but I can not remember where I got it so apologies for
that).
Here is a picture of the pattern.
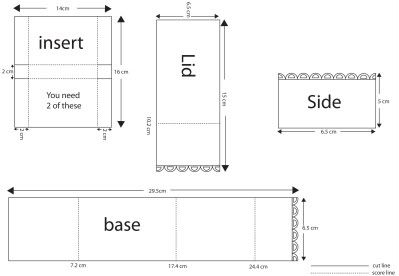
I hope I have done it right. If you click on it you should go to a bigger version.
Materials you need
Card in two complementary colours
Patterned paper
Ribbon (about 16")

Cut all of the pieces and score as directed.
Starting with the inserts, stick them to the base and fold up and stick the sides too. Punch the end with a fancy border punch.
Adhere the lid to the underneath of the scalloped flap to complete the lid.
Taking ribbon of your choice, cut it in half and adhere one each to the side pieces. Now stick these to the side of the box.
The flowers

It is amazing what you can do with a scallop circle punch. Both of these flowers were made with a scallop circle punch.
The top flower
Punch 6 circles and cut into the middle of them, going further into the middle of the circle as you go.
Take each 'petal' and curve it around an embossing tool. When you have done all 6.
Start with the one that has the biggest 'middle' bit and stick the next one on top of it, carry on 'til they are all stuck together.
Taking a 1/8" circle punch, punch a hole in the middle and add a brad to pretty it up.
Bottom Flower (I got this from Monica and Stamp With Us)
- This again was made using a scallop circle punch.
- You need 8 circles (4 of each colour). (You can cut them like the first flower or do it plain like I have)
- Lay them flat on your cutting mat and spritz them with water on both sides.
- Scrunch them up and then blot them with kitchen paper.
- Now straighten them out and place alternately one on top of the other. Take four and punch with the 1/8" circle punch and again with the other four.
- Place them all together and place a brad in the middle and leave to dry
When the flowers are dry they will 'crisp' up and keep the shape that they have been 'scrunched' into.
I hope you like this and understand the directions.
Until next time
Happy crafting
Emma xx
No comments:
Post a Comment
wonderful people commenting on my little Stampin' Up! blog