A Huge Thank You

Thanks for taking the time to visit my Stampin' Up! blog. I would love for you to either leave a comment or follow my blog and then I can come and see your work and leave comments for you too.

Emma xx
Independent Stampin' Up! Demonstrator in England UK. All things Stampin' Up for card making, scrapbooking, wedding stationery, gifts, card making classes, scrapbooking classes, gift making classes.
http://picasion.com/i/1TioE/
Showing posts with label Oval punch. Show all posts

Wednesday, April 21, 2010

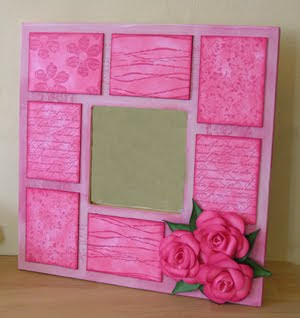
Look What I Made At the Weekend

... I went to Claxby at the weekend and we made one of these.


I have used Regal Rose and Rose Red to colour the background.  I have then used the Very Vintage wheel to decorate the mirror.  The small pieces of art are made using En Francais, Vintage Vogue and a rubber band around my brayer to make the swirly lines.  I made the roses by using a 1" punch and fixing 7 together to make a 6 petal flower.  Each flower needed 3 cutouts.  These are made from Whisper white that I have coloured with Regal Rose and Rose Red to give some depth.  The leaves were made from the oval punch cutting one end to a point.  (mirror was £1.19 from IKEA).

I hope you like and until next time

Happy crafting

Emma xx

Tuesday, April 20, 2010

Tuesday Taggers

It is that time of the week again.  Tuesday Taggers have the theme of Dragons this week chosen by the lovely Teri.  I haven't got any dragon stamps, or anything like that so I thought out of the box a little and went with a dragonfly.


The background has been brayered with bashful blue and old olive ink onto whisper white c/s. I have stamped and masked the flowers from Greenhouse Garden with Perfect Plum, Taken with Teal and Elegant Eggplant.  The dragonfly is punched using Taken with Teal and Elegant Eggplant.  The wings have been punched with the large oval, the body has been punched using the Word Window punch and then cut to a point.  The attennae have been made by cutting a slither of Taken with Teal c/s and sticking to the underside of the head.

So go and have a look what the rest of the DT have done at Tuesday Taggers

I hope you like

Until next time, happy crafting

Emma xx

Monday, April 12, 2010

Just some brayering

Hi Guys

If somebody had said to me a year ago that I would be able to brayer without getting any lines on my work I would have laughed at them.  Now though I can brayer confidently and produce pieces of work that I am very very proud of.  I have to thank my fellow teamie and very good friend Michelle for showing me how to do it.

Here are some pieces of work I have done this week


This is just general brayering using a piece of waste paper torn so that I could form hills.  The tree is from Lovely as a Tree


Done the same as the one above but only one hill.  I have used 3 stamp sets in this piece.  Forest Friend (coloured the white bits with white gel pen), Autumn Days for the foliage around the edges and Lovely as a Tree for the trees.


This is just done by brayering the top in regal rose and the bottom with bashful blue.  The bottom stripes have been done by randomly putting elastic bands on my brayer and inking up and rollering over the image.  I have used Flight of the Butterfly for the stamp set.

Just a little bit of what I have been doing this week.

I hope you like and until next time

Happy Crafting

Emma xx

Wednesday, March 31, 2010

Its a bugs life

Hi Guys


I am a day late for Tuesday Taggers and this week it is all things bug like. The Design Team have surpassed themselves again and produced some magnificent work.


I have resorted to some punch art again this week as it is my nieces birthday next week and she is 5.


the recipe is as follows,
Whisper White card blank
To The Nines DSP
Mellow Moss Gingham Ribbon
Pewter Hodgepodge
Oval All Stamp Set
Lge Oval Punch
1 3/4" Circle Punch in Real Red and Basic Black
1" Circle Punch in Basic Black
1/4" in Basic Black
Plain and simple this week.
I hope you like and until next time
Happy Crafting
Emma xx

Tuesday, November 24, 2009

Tuesday Taggers - Festival of light


Hi Guys

Over at Tuesday Taggers this week the challenge is the festival of light. With last weeks post about punch art, I have used my punches on this one again.


I have used four rectangles of whisper white card stock. At the top of 2 of the rectangles I have used the large oval punch on its side and punched just less than half away. I have used mellow moss ink to highlight the candles to give them some depth and then stuck that layer onto the other rectangles. The flames are also cut with the oval punch and then shaped to give them the appearance of a flame. I have reverse masked the flame (cutting the shape of the flame out on post it note and the cutting the middle bit out and using ruby red ink to colour it in with a dauber). The border has been cut using the Eyelet border punch. I have matted and layered with Spiced Cider DSP. The pattern on the candle and the sign have come from the 'Spotlight On Christmas' stamp set from SU!

I hope you like.

Until next time happy crafting

Emma xx

Monday, August 3, 2009

Post It note Holder

Hi All

Well this is a little thing that I made with a group of ladies that I teach along with some other things as well.

We had fun making this and it was something that I thought wouldn't take long at all but between this and the other two things it took them nearly 3 hours, but we did have a giggle.


I have used Oval All for the sentiment and the oval and scallop oval punches all from the mini catalogue to punch it out. Card stock for this is Bashful Blue.

The Designer Series Paper is Washington Apple again from the mini catalogue.

Card stock is lovely lilac and lavender lace which can be bought from the main catalogue.

I have seen this idea done before but I can't remember where from so apologies to the original owner of the design.

I hope you like.

Enjoy

Emma xx

Wednesday, April 8, 2009

Sorry and a Crafty post

Here is my entry for the Stamp With Us challenge this week.  I have cut it a bit fine but none the less here it is.


The recipe for this card is:

Very Vanilla for the card base
Bashful Blue Designer Series Paper
Oval All (from the mini Catty) stamped with Basic Grey ink
Scallop Oval punch (from the mini Catty)
Large Oval Punch (from the mini Catty)
Close to Cocoa card stock for matting
Summer by the Sea stamped onto Very Vanilla with Basic Grey ink (softer finish)
Water coloured with Bashful Blue, So Saffron, Green Galore, Close to Cocoa and Barely Banana Stampin' Write markers
1/2" Striped Grosgrain Ribbon in Bashful Blue (from the mini Catty).

I hope you like.

Emma xx